📌 Prerequisites
Before you begin, make sure:-
You have Android Studio installed.
-
Kotlin is selected as your development language.
-
You’re ready to explore the magic of app development!
You have Android Studio installed.
Kotlin is selected as your development language.
You’re ready to explore the magic of app development!
🧑💻 Step 1: Launch Android Studio
When you open Android Studio, you’ll see the Welcome screen with your recent projects (as shown below): Click on the “New Project” button to get started.📱 Step 2: Choose a Project Template
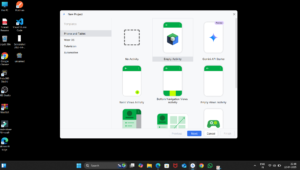 Android Studio will now ask you to choose a template for your project.
You can choose from several options like:
Android Studio will now ask you to choose a template for your project.
You can choose from several options like:
-
- Empty Activity
-
- Basic Views Activity
-
- Bottom Navigation
-
- Jetpack Compose
-
- And more…
📝 Step 3: Configure Your Project
Here’s where you define the basic details of your project:-
- Name: The name of your application. E.g.,
CreateApplication
- Name: The name of your application. E.g.,
-
- Package Name: Unique identifier (auto-generated from the app name).
-
- Save Location: Choose where the project files will be saved.
-
- Language: Select Kotlin.
-
- Minimum SDK: Choose API 24 (Android 7.0) or higher.
-
- Build Configuration Language: Keep it as Kotlin DSL.
🛠 Step 4: Project Setup in Progress
Android Studio will now build the project and set up all required files. This may take a few minutes depending on your system. Once setup is done, you’ll see the MainActivity.kt file, which is the entry point of your app.🎉 Step 5: Run Your First App
-
- Click on the Run button (green triangle ▶️) on the toolbar.
-
- Choose a connected device or emulator.
-
- Android Studio will build the APK and launch your app.
🔚 Conclusion
That’s it! You’ve successfully created your first Kotlin Android project. From here, you can start learning about UI design, navigation, Jetpack components, and more. 📌 Next Steps:-
- Learn about
ActivityandViewModel.
- Learn about
-
- Try changing text on the screen.
-
- Add a button and show a toast.
💡 Stay tuned and keep coding with Programming Keeda!
Reading your work felt like discovering a new language — one that speaks directly to the heart while still offering intellectual depth.
Great information. Lucky me I discovered your blog by chance (stumbleupon).
I’ve book-marked it for later!
My web page – big paragraph copy and paste
Thank you so much for your kind words! 😊 I’m really glad you stumbled upon the blog and found it helpful. Feel free to explore more posts anytime, and don’t hesitate to share your thoughts or questions. Happy learning!
Hi every one, here every one is sharing these familiarity, therefore it’s fastidious to read this weblog, and I used
to pay a visit this blog every day.
After exploring a few of the blog posts on your web site,
I seriously like your way of blogging. I saved as a favorite it to my bookmark site list and
will be checking back in the near future. Take a look at my
web site as well and tell me how you feel.
Your way of describing all in this article is really good,
every one can effortlessly know it, Thanks a lot https://www.transportrbeaudet.ca/fr/l-humidite-dans-la-maison
Your mode of telling all in this post is really fastidious,
every one can easily understand it, Thanks a lot https://www.lepetitdep.com/
Your method of describing everything in this piece of writing is really good,
every one be capable of without difficulty understand it, Thanks a lot https://hermine.ca/
Your method of telling the whole thing in this paragraph is truly good, every one be capable of simply know it, Thanks a
lot https://coiffstore.fr/shu-uemura-175
Your method of telling all in this piece of writing is in fact pleasant, all
be capable of simply know it, Thanks a lot https://applicationmp.com/
Your method of explaining the whole thing in this post is really good, all be able to
easily understand it, Thanks a lot http://www.lesaventureseoliennes.net/site/-longs-s%C3%A9jours-en-sicile-en-appartement-4
Your way of telling all in this post is truly pleasant,
all be able to easily be aware of it, Thanks
a lot https://abrasifsea.com/en/produit/sc-cylindrique-a-bout-rond/
Your mode of explaining all in this paragraph is truly pleasant, every one can without difficulty know it, Thanks
a lot http://www.lesaventureseoliennes.net/site/-longs-s%C3%A9jours-en-sicile-en-appartement-4
Your way of describing the whole thing in this article is genuinely
fastidious, all be capable of easily be aware of it, Thanks a lot
Your method of describing everything in this piece of writing is genuinely nice, all can without difficulty know it, Thanks a lot https://abrasifsea.com/categorie-produit/feuilles/
Your mode of describing all in this post is in fact pleasant,
every one be able to simply understand it, Thanks a lot https://formationmatieresdangereuses.com/a-propos-une-formation-de-conduite-de-chariots-elevateurs/
Your method of telling all in this article is really nice, every one be able to easily
know it, Thanks a lot https://chaussuressemy.com/boutique/
Your way of describing the whole thing in this piece of writing is really nice,
every one be capable of effortlessly know it, Thanks a lot https://blonnoir.com/fr/
Your way of describing the whole thing in this post is in fact good, all can simply know it, Thanks a lot https://www.instapneus.com/en/
Your mode of explaining the whole thing in this paragraph
is genuinely good, every one can simply understand it,
Thanks a lot https://bleuyoga.ca/